Recently I was made aware that rotating videos on the Pi3 was slower with the new KMS/DRM method of displaying content on a screen. This resulted in a technical deep dive into why rotation worked faster in previous versions and what to do about this for a future release.
Difference between older firmware and KMS/DRM
With all models up to the Pi3, the default back then was to run video output through a firmware running on the Pi. There was a proprietary API (dispmanx) to control how output was placed on a screen. Here’s a very old blog post about this.
When rendering a landscape video rotated by 90/270 degree (so it can be placed the “right way up” on a 90/270 degree rotated display), the dispmanx API allowed info-beamer to directly rotated that video with quite low overhead.
KMS/DRM is a standard API on modern Linux systems to interact with graphics cards and display hardware. It makes sense to switch to this method on the Pi too to make it more compatible with modern software (like labwc or wayland) and make the Pi more future proof. This API was first supported with the Pi4 and is mandatory on the Pi5. The implementation is backwards compatible with older Pi models and thus the Pi3 also supports it.
The Pi3 is also the only older models that supports running in 64bit mode. Unifying the Pi3, Pi4 and Pi5 sounds promising as it would allow packages like the new web browser to run on a Pi3 and would simplify adding new features in the future.
Unfortunately rotating video content by 90/270 degree using DRM/KMS isn’t simple: In theory DRM supports such rotations, but neither 90 nor 270 degree are supported by the Pi.
How video data is represented
Videos normally use the YUV420 pixel format. One would expect each pixel of a video to be represented by three bytes (red, green and blue). But videos often use a trick to reduce memory usage by half: They instead encode each pixel with one byte of luma (the Y component) and then for each square of 2x2 pixels another two bytes of chroma (U and V). This means the the two chroma channels are scaled down by 50%.
For a 1080x1920 video, this would result in a 1080x1920 luma buffer and two 540x960 chroma buffers. Combined resulting in a memory size of only 1.5x times the resolution of the video. This saves a lot of memory as the naive encoding of using one RGB byte triple per pixel would result in each video frame being 3x its resolution.
The H264 hardware decoder on the Pi returns the decoded video as three concatenated Y, U and V buffers.
Rotating videos using OpenGL
Right now on the Pi4 and Pi5, info-beamer uses OpenGL to rotate videos. This works as follows:
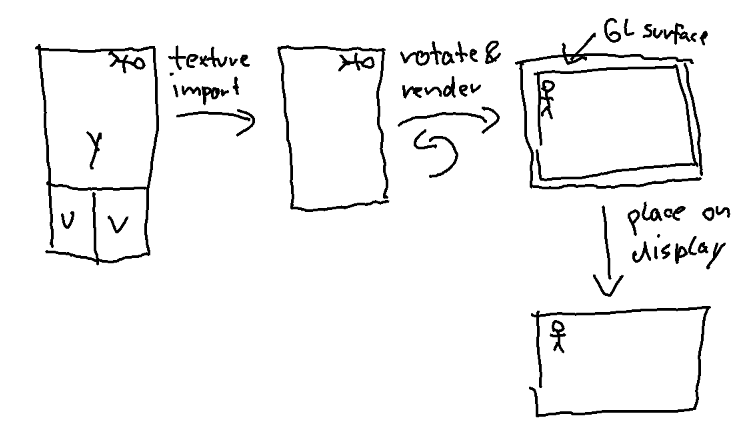
- The decoded YUV video frame is imported into OpenGL as a texture.
- The texture is drawn rotated by 90/270 degree into the GL surface.
- That GL surface is place on the display.
This has the advantage that the video can be freely rotated and affected by shaders and other shenanigans. The downside is that the texture import implicitly converts the YUV data in RGB and the drawing itself then copies that RGB data into an RGBA buffer. All that eats a lot of memory bandwidth. This is acceptable on the Pi4 and Pi5 as they are usually fast enough, but the Pi3 unfortunately isn’t.
The result is that rotating videos using this method can result in overall frame rate to slow down on the Pi3 once a rotated video is placed on the display.
Rotating YUV data on the Pi3
Rotating using GL is too slow: The new goal now is to rotated each individual YUV plane itself, then place the result unrotated on the display. As the combined YUV data size is a lot smaller than having to rotated RGBA, performance should be a lot better. But it turns out, rotating video data is quite expensive to do in software. A 1080x1920 video in YUV420 has a total of 1080 * 1920 * 1.5 = ~3.1MB. For a 24 frames/second video this means handing 75MB/s while doing some shuffling around with that data.
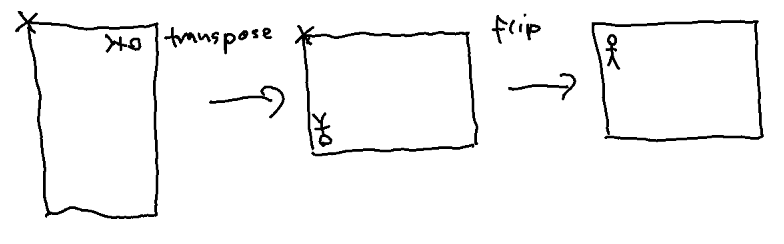
One way to slightly make this task easier it to not rotate the data but transpose, then flip it. Transposing is slightly easier to implement and the DRM API supports flip with zero overhead.
So how would one transpose efficiently on a Pi3? I first looked into using NEON instructions. These instructions are supported by the ARM processor the Pi uses and allow handling of multiple bytes at once. Usually 8 or 16. I managed to put a first version together and the result was promising: The frame rate was almost back at 60 for a 24fps FullHD video, but one CPU of Pi was saturated just running this code. So while the result was okayish, I wanted to do better.
The Pi VPU
In the forum post I made, using the VPU of the Pi was brought up. The VPU is (AFAIK) the processor that actually boots up first once you power up the Pi. It, for example, fires up the ARM processor, loads the kernel from the SD card and then starts it up. Once the ARM side of the Pi is running, the VPU can be interacted with by sending short mailbox messages to it. One such message allows running almost arbitrary code on the VPU.
The VPU is very interesting and has a feature I’ve personally never seen before. It has a huge 64x64 register that can be read and written to both vertically and horizontally. This sounds perfect for transposing data: First read 256 bytes by doing 16 loads of 16 bytes each and placing them horizontally into that a 16x16 area within that huge register. Then do 16 stores, each writing 16 bytes, but this time using vertical access.
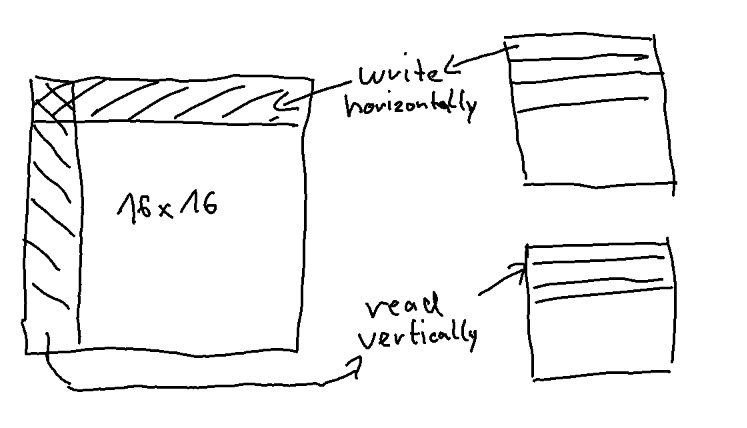
This transposes 16x16 bytes with just two instructions. Here’s example code for that.
v8ld H(0++,0),(r0+=r2) REP16
v8st V(0,0++),(r1+=r3) REP16
The r0 register points to the pixel data in memory, while r2 contains the line size (so for example 1080 pixels). Each v8ld instruction reads 16 bytes from r0, places them horizontally (“H”) into the row starting at position 0,0 in the register. Then the operation is repeated 16 times, each time writing to a new row (0++, 0) while incrementing r0 by r2.
The second line then writes back into memory, but this time using vertical access (“V”). r1 points to the destination memory and r3 is the line size of that buffer (1920 in the above example). It is also repeated 16 times each time reading from the next column (0, 0++) while also incrementing r1 by r3.
This instruction set is amazing for such operations and using a form of the above example alone allowed transposing the 24fps FullHD video at much lower CPU usage compared to NEON. Basically the ARM code just has to prepare a bit of data instructing the VPU where to read and write data and then hand over control to the VPU.
After a deep dive into how to best all use that, I managed to improve performance even further and I can now transpose 1.1GB/s using a memory bandwidth optimized 64x64 transpose split into four individual 32x32 steps. Clearly a lot more than the 75MB calculated above.
Improved video render path
This now allows the following data flow when rendering a hardware decoded video rotated by 90 or 270 degrees on a display:
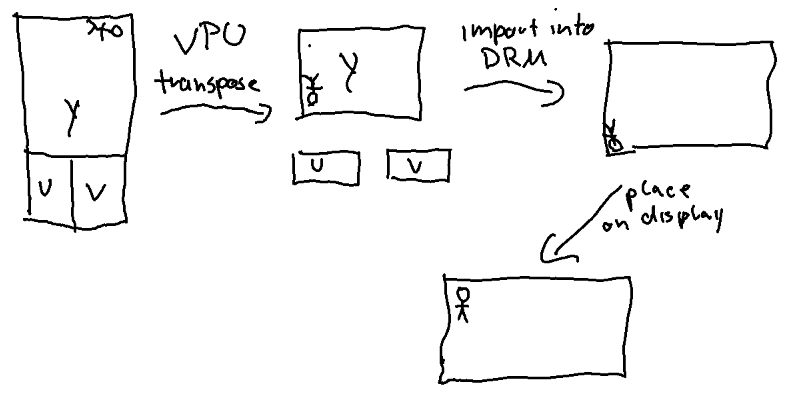
- The three YUV planes of the decoded video are individually transposed using the VPU into three individual Y, U and V target buffers. Thanks to using that external processor, the ARM CPU itself remains mostly idle.
- The three transposed buffers are then imported into DRM. This is a zero copy operation and is basically “free”. Note that due to transposing (and not rotating) the frame is still upside down.
- The frame is then placed on the screen and is using a flip to fix the wrong orientation. This operation is also “free” and entirely handled by dedicated hardware.
As a result rotating videos is now way faster on the Pi3 and performance should increase massively. This change needs a bit more testing but will eventually be enabled for all newly installed Pi3 devices and eventually all of them. Stay tuned ![]()

