Hi Folks who are using Macs to setup your SD cards, I figured out the hard way that to get info-beamer onto an SD card and have my RPI 4 boot properly, you must follow the following steps:
use a program like balenaEtcher to burn the .img.gz file to your SD card
Downloading the .zip files, unpacking them, and copying the resulting files to a FAT32-formatted SD card does not work on Mac (MB Air + Mojave).
Note that the current stable release (OS 10) doesn’t boot on the PI 4 yet, you have to use the OS 11 testing version. (It works a treat, @info-beamer you guys are amazing!)
I use a MacBook to prepare the SD cards for info-beamer, I just use the SD Card Formatter app to make sure the card is correctly formatted and then download my custom zip file, extract it and drag the files onto the SD card.
I’ve never had to burn the image file using Etcher, in fact a huge advantage of info-beamer.com is the ability to just drag n drop the files and have a device automatically connect to the WiFi you have configured and appear in your device list.
Compared to other pi signage systems that run on another OS, info-beamer is extremely easy to set up and has rock solid reliability.
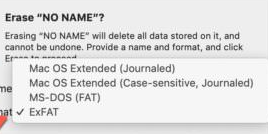
As I don’t have a MacOS device to test this: How does MacOS format an SD card by default? If the zip based installation doesn’t work, my guess would be ExFAT instead of FAT32? Can someone check that? The following screenshot I found online seems to confirm that:
Selecting MS-DOS (FAT) should help in that case. Reason is that the Pi firmware cannot boot from ExFAT. Only FAT32 is supported.
If it still doesn’t work in that case, I’d be very interested in figuring out why.
Is there a way to change that default? The above screenshot I linked looks like it should be possible. What happens if you select “MS-DOS (FAT)” there?
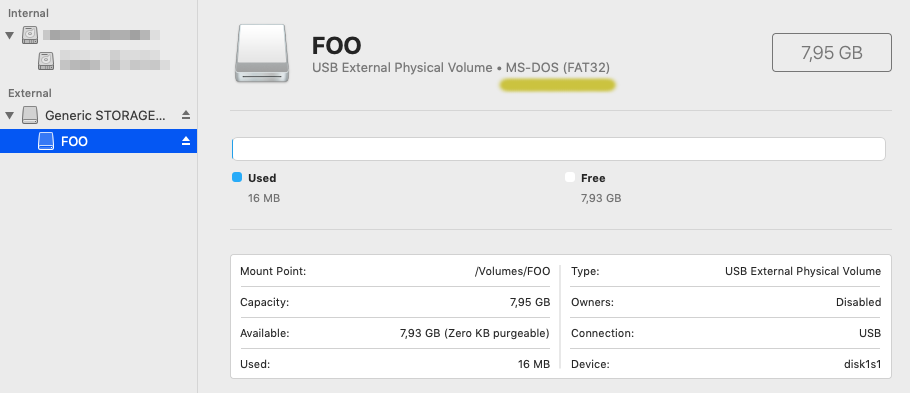
I thought I’d look into this. Here’s the result on a Mojave system. I’m starting this with an SD card that already had info-beamer installed, but this is irrelevant for this walk-through. Any other SD card with any content on it should work exactly the same:
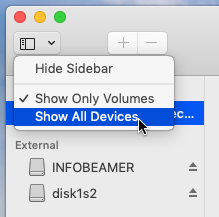
First start the Disk Utility and click the View button in the top left corner and select Show All Devices. This is required to not only see the logical volumes on each disk/SD card/etc but also the physical volume (If you want to learn the difference, have a look at https://en.wikipedia.org/wiki/Disk_partitioning).
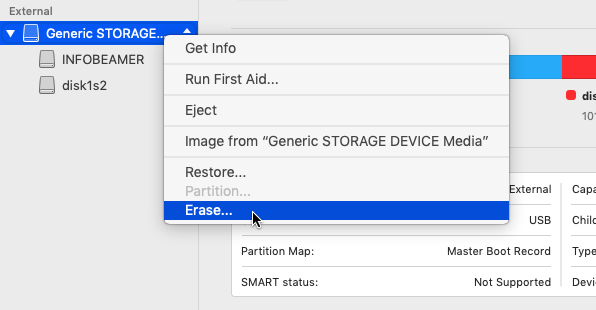
The SD card should be under External. Mine shows up as named as my SD card reader device (Generic STORAGE DEVICE Media).
The complete SD card needs to be wiped next and all existing partitions (Volumes in OSX speak) must be removed. Right-click on the SD card and then Erase….
BE SURE TO ERASE THE CORRECT VOLUME. This step is irreversible and deleting your hard drive or other attached devices is possible if you are not careful! If you’re uncertain whether you’re deleting the correct device, do NOT proceed!
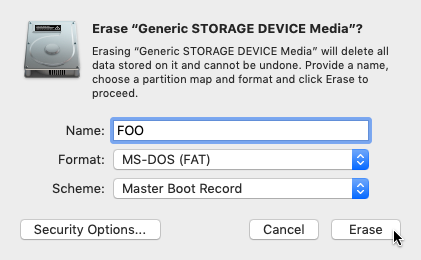
The next step is to select a partitioning scheme. The Pi only supports Master Boot Record, so be sure to select that. Similarly only MS-DOS (FAT) is supported. The other MacOS and ExFAT option will not work. Name the disk any way you want. info-beamer will later rename it anyway. If and only if you’re sure you’ve selected the correct volume click on Erase.
The result is a completely wiped SD card with a single volume on it. As seen in the following image, the file system used for that volume is FAT32.
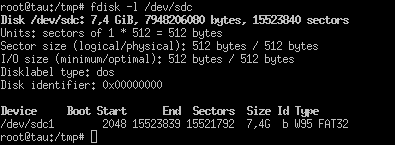
I confirmed this on a Linux box. The resulting partition scheme and file system is compatible with the Pi:
The next step is then to extract the install.zip files into the newly created volume, eject it and insert it into the Pi. That worked perfectly in my test.