Work on the permission system is making big progress. Expect a first release soon. Here’s a few screenshots of the new UI and a few example uses.
Shared access page
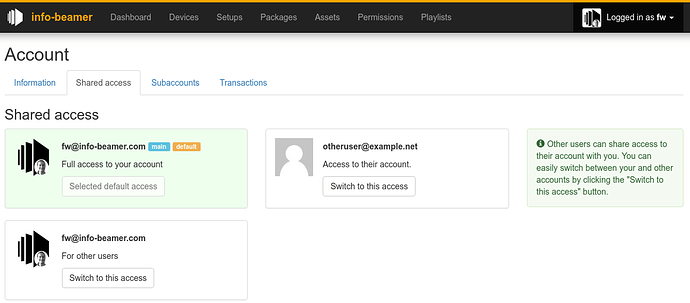
You can now share access to your account with other users and other users can invite you into their account. Once such an invitation is accepted by you, you can switch between accessing your own account and the other account(s) using the new “Shared access” page. It’s accessible from the menu at the top right corner:
Clicking on Switch to access on another users account lets you access that account. Of course the user that invited you has full control over what you can actually do in their account.
Your own account is also listed here. If you want to switch back to your own account, just click on its Switch to access button. You might wonder why my account (fw@info-beamer.com) is listed multiple times. Check out self access below for more information on this feature.
New permissions tab
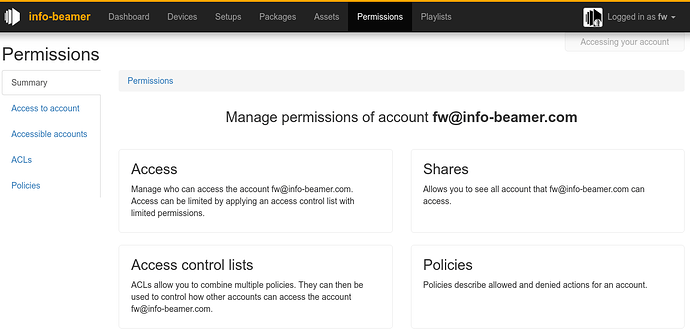
Managing access gets its own tab. You can control access to your own account, manage the accesses you have to other accounts and use or create your own rules on which permissions apply.
Access tab
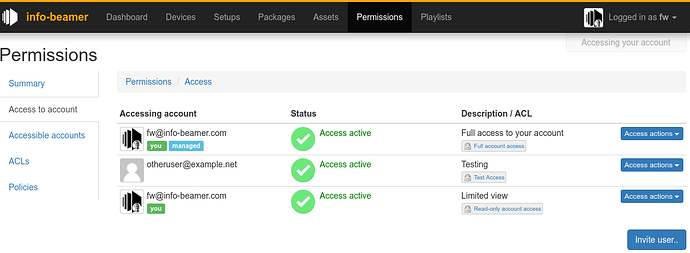
The “Access to account” tab shows you who can access your account. The first line is an auto-generated access that allows you to access your own account. The second line allows otheruser@example.net access using the Test Access access control list. Finally the third line allows you access to your own account, but with limited permissions controlled by the Read-only account access access control list.
Accessible accounts tab
Next is the “Accessible accounts” tab. You can see all accounts you have access to. This is essentially the exact same list you saw in the Shared access page listed above. If you no longer need access to one of the listed accounts, you can leave it here:
ACL tab
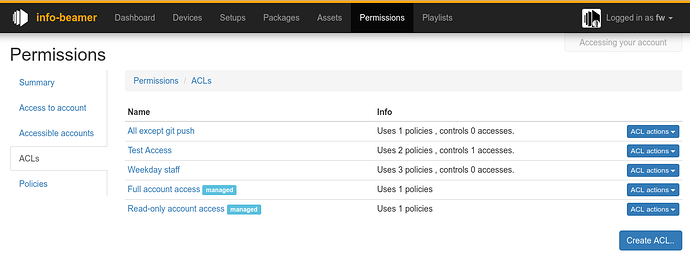
The ACL tab allows you to create, edit or delete access control lists (ACLs). ACLs bundle up any number of policies. If you want to manage multiple users accessing your account and all of them should have the same permissions, a single ACL is enough for that. If you need different permissions for each user, create one ACL for each one of them using different policies.
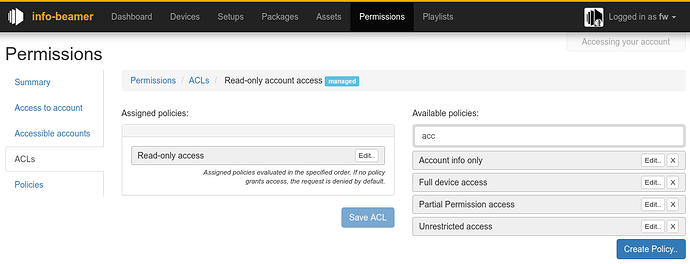
When you click on any of the ACLs you can see which policies they use. You can add a policy to an ACL by dragging it to the “Assigned policies” column.
Policies tab
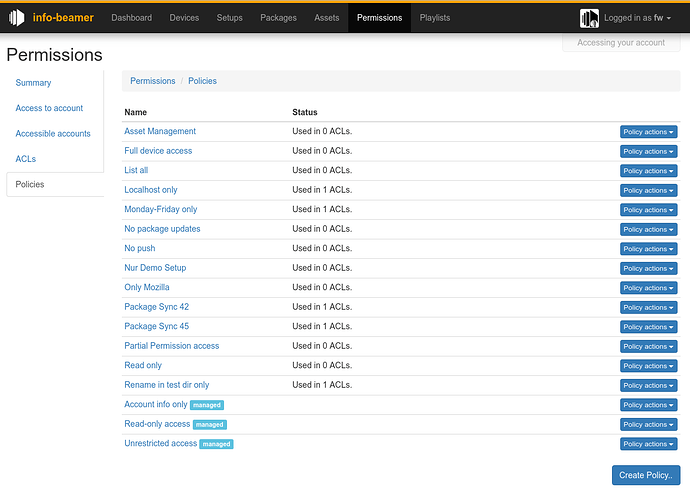
Policies are what actually controls if an actions is allows or denied. Policies can be used in any number of ACLs.
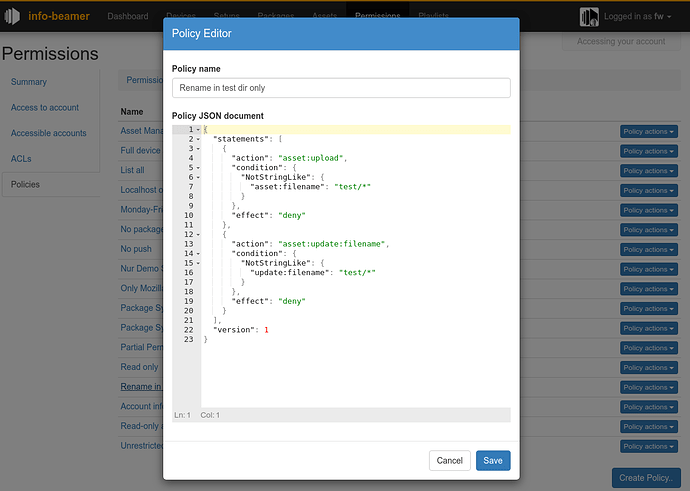
A policy is a (usually short) JSON document that lists an action, an optional condition and an effect. Every action made by another users to your account can be controlled that way. Example actions are device:create, setup:update:config or asset:update:filename. The API documentation will be updated of course to describe which API call corresponds to which action.
The effect is either deny or allow.
The condition value adds the real power to the policies. Here you can describe which condition must be matched before the policy has an effect. You can usually check for different attributes of objects (devices, packages, setups, assets, etc) that are created, modified or deleted.
For example you can ensure file renames are only possible in the test folder with the policy shown below. Conditions also allow you to limit certain action to a subset of everything in your account. So you can deny a user access to any device with a name starting with reception/*. Finally you can match for per-request values like the remote ip or current time. This can be used for example to make sure that some device cannot be edited unless the logged in user is currently using the dashboard from your office network. For some objects it’s also possible to match values set in their (usually hidden) userdata value.
To make things easy, there will be different useful policies available by default. Those might be “Device Administrator access” (full access to all devices), “Device View access” (read-only access to all devices). Instead of writing your own policies you can then just use them to build your ACLs.
Multiple API keys per account
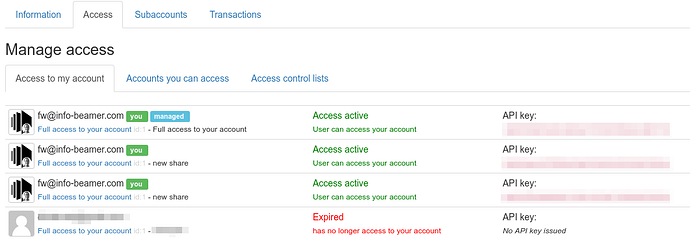
Above you saw that you can have multiple different accesses to your own account. You might wonder why that’s useful: Each access does have its own API key and ACL. This allows you to create additional API keys for your own account with limited access. Here are several examples where that might be useful:
-
Some users use the account information API call in their monitoring systems to check if the account balance will reach 0 soon. Previously you had to use your single API key for that. This means that your monitoring system has complete access to your account, even if it’s only interested in how many credits you still have. With the new permission system you can create a new access to your own account, add a ACL with a single policy that only allows access to the account information call and use that API key for your monitoring system. Even is the API key leaks, it can’t be used for anything other than the configuration use case.
-
Integration into automated pipelines: Previously every package imported had a webhook URL. This URL could be used to essentially trigger a package update API call without authentication as a secret component was included in the called Url. This feature will be removed but can be fully replaced with the new permission system: If you want to allow an automated system to update some of your packages, you can now create a new policy that only allows the package:update:sync action for certain package_ids.
-
If you want to create a custom ACL used for sharing your account with another user, you can test this ACL yourself by creating a new access to your own account and assigning that ACL. You can then verify that the policy works as intended before assigning it to a real user.
Structuring account access
The permission system is really flexible. If you want to set up a signage network with multiple users, you can now create a single master account. This account has all the devices, setups, packages and assets. Your users then create their own account and the master account invites those users. Of course while assigning custom ACLs to each user. You can for example have an ACL that only allows users to edit devices with a certain location name.
When the users log in, they first end up in their own account, but can easily switch over to the signage network account and modify only their devices.
Next steps
Which this all looks fairly complete, there’s still some work left. A big part is documentation as this feature can be quite complex. So there’s still no final ETA for the feature, but it’s pretty close now. Feedback welcome.


 ), here’s how to prevent access to the API using curl: